
- Содержание
- Pizza Brain
- First Step — Basic HTML Page
- Example
- Example Explained
- Как создать страничку
- Создать страницу проще, чем вы думаете
- Mammothbooth
- Теги – основа языка HTML
- Пример блочной вёрстки
- Working with Selectors
- Type Selectors
- Class Selectors
- ID Selectors
- Additional Selectors
- Free Blogging HTML Templates
- Spurgeon Clean & Minimal HTML Blog Template (Free)
- Emily Personal Blog HTML Template (on Envato Elements)
- Editorial & Blogging HTML5 Web Template (Free)
- Genial Minimal Blog HTML Template (on Envato Elements)
- Brook Minimal HTML Template for Blogs (Free)
- Future Imperfect HTML5 Blog Template (Free)
- Dropcast HTML Website Template (Free)
- Massively Blogging HTML5 Web Template (Free)
- BucketListly
- 96 Elephants
- Lab Partners
- Simple Portfolio Website Template in HTML & CSS
- Envoy
Содержание
Создайте макет из 2 столбцов, разделенный на «Боковое содержание» и на «Основное содержание».
<div class=»row»> <div class=»side»>…</div> <div class=»main»>…</div></div>
Мы используем CSS Flexbox для обработки макета:
/* Обеспечения правильного выбора размера */* { box-sizing: border-box;}/* Контейнер колонка */.row { display: flex; flex-wrap: wrap;}/* Создайте два неравных столбца, которые находятся рядом друг с другом *//* Боковая панель/левая колонка */.side { flex: 30%; /* Установите ширину боковой панели */ background-color: #f1f1f1; /* Серый цвет фона */ padding: 20px; /* Немного отступов */}/* Основная колонка */.main { flex: 70%; /* Установите ширину основного содержимого */ background-color: white; /* Белый цвет фона */ padding: 20px; /* Немного отступов */}
Затем добавьте запросы мультимедиа, чтобы сделать макет отзывчивым. Это позволит убедиться, что ваш сайт хорошо выглядит на всех устройствах (настольные компьютеры, ноутбуки, планшеты и телефоны). Измените размер окна браузера, чтобы увидеть результат.
/* Адаптивный макет — когда экран меньше, чем 700px широкий, сделать два столбцы складываются друг на друга, а не рядом друг с другом */@media screen and (max-width: 700px) { .row { flex-direction: column; }}/* Адаптивный макет-когда экран меньше 400 пикселей в ширину, сделайте навигационные ссылки стекаются друг на друга, а не рядом друг с другом */@media screen and (max-width: 400px) { .navbar a { float: none; width: 100%; }}
Совет: Чтобы создать другой вид макета, просто измените ширину flex (но убедитесь, что он добавляет до 100%).
Совет: Вам интересно, как работает правило @media? Подробнее об этом читайте в главе CSS Медиа запросы.
Совет: Чтобы узнать больше о модуле гибкая компоновка коробки, прочитайте нашу главу CSS Flexbox.
Что такое размер коробки?
Вы можете легко создать три плавающие коробки бок о бок. Однако, когда вы добавляете что-то, что увеличивает ширину каждой коробки (например, заполнение или границы), коробка сломается. Свойство позволяет нам включить отступ и границу в общую ширину (и высоту) коробки, убедившись, что отступ остается внутри коробки и что он не ломается.
Вы можете прочитать больше о свойстве box-sizing в нашем CSS Размер коробки Учебник.
Pizza Brain
Pizza Brain is fully responsive and looks great on smaller layouts
Examples of CSS don’t get much better than this! Founded by Brian Dwyer, Pizza Brain is the world’s first Pizza Museum and restaurant. The website promotes press releases and a blog describing the progress of the endeavour and features branding designed by Michael Almquist.
Fonts Pacifico Regular and Bebas Neue are paired with a warm, pizza-like colour palette creating a friendly aesthetic that’s easy to read while still exciting and fun. «That orange, it’s beautiful and it really sets the stage for the content,» says the developer, Arjun Mehta.
A variety of rounded corners and opacity effects round out this clean look. “To have each post on its own rounded rectangle content section was actually borrowing from the visual language found on Pizza Brain’s business cards,” adds Mehta. Fully responsive as well, the site looks great on smaller layouts.
One of the top examples of CSS in action – and keep your eye on the site as more is expected to come. «I’m excited about how the site might grow, and get further refined and built out as this amazing venture becomes realised over time,» says Mehta.
First Step — Basic HTML Page
HTML is the standard markup language for creating websites and CSS is the language that describes the style of an HTML document. We will combine HTML and CSS to create a basic web page.
Note: If you don’t know HTML and CSS, we suggest that you
start by reading our HTML Tutorial.
Example
<!DOCTYPE html>
<html lang=»en»><head><title>Page Title</title><meta
charset=»UTF-8″><meta name=»viewport» content=»width=device-width,
initial-scale=1″><style>body {
font-family: Arial, Helvetica, sans-serif;}</style>
</head>
<body><h1>My Website</h1><p>A website created by me.</p>
</body></html>
Example Explained
- The declaration defines this document to be HTML5
- The element is the root element of an HTML
page - The element contains meta information about the document
- The element specifies a title for the document
- The element should define the character set to be UTF-8
- The element with name=»viewport» makes the website look good on all devices and screen resolutions
- The element contains the styles for the website (layout/design)
- The element contains the visible page content
- The element defines a large heading
- The element defines a paragraph
Как создать страничку
Первую страницу я предлагаю вам сделать в блокноте. Самом простом, который находится в меню «Пуск», папка «Стандартные». Пока не нужно ничего скачивать. Попробуйте воспользоваться тем, что имеете.
Откройте документ.
Вставьте в него вот этот код.
Моя первая страница
Создать страницу проще, чем вы думаете
Многим может показаться, что создание сайтов дело сложное, даже невыполнимое. Для этого нужно много учиться, узнать, сделать. На самом деле существует около 100 тегов, которые даже не обязательно учитьВажно лишь понять, что и где применяется. Информацию можно подсмотреть в различных шпаргалках, а со временем вы начнете вспоминать теги на автомате.
Простой код позволяет сделать текст красным
Написать жирным не намного сложнее
Мы дошли до самого низа
Теперь вы знаете чуть больше о тегах и можете использовать их
Давайте попробуем вставить ссылочку, чтобы связать несколько страниц воедино.
К примеру, вот ссылка на мой блог — Start-Luck — рассказывает просто о «сложном».
Ну вот и все. Ваша первая страница готова
Теперь нажмите «Сохранить как…». Это очень важный момент.
Файл нужно назвать index.html. Окончание «.html» указывает на расширение файла. Если вы просто введете название индекс, то документ сохранится как текстовый файл и не откроется браузером.
Я сохранял документ на рабочий стол. Теперь нужно найти его, нажать правую кнопку мыши и открыть с помощью любого браузера. Я выберу Google Chrome.
Вот так выглядит только что созданная мной страничка. Ваша ничем не будет отличаться. Все точно также: с картинками и цветным шрифтом.


Сейчас я более подробно расскажу о тегах, а пока давайте просто уберем из заголовка «center» и вставим строчку, в которой содержится слово «Color». Кстати, как менять цвет html я уже писал. Это очень просто, рекомендую к прочтению.
Еще раз сохраните документ, в этот раз можно просто воспользоваться сочетанием клавиш Ctrl+S, а затем обновите страницу в браузере при помощи кнопочки F5
Помните, практически любой тег должен открываться и закрываться. То есть где-то должен располагаться код со слешем. В данном случае он выглядит так: </font>.
Видите, заголовок стал красным. Точно также вы можете придать нужный оттенок любой части текста.
Ну вот и все, пример готов, и вы должны гордиться собой. Конечно, она еще не находится онлайн, для этого веб-страницу надо выложить на сервер, который предоставляется хостингом. Нужно также подключить свой домен, чтобы и другие люди могли увидеть ваше творение.
Пока страничку видите только вы. Но согласитесь, таким сайтом можно удивить только человека из железного века. Но это первый опыт, давайте сделаем его еще более успешным, разобравшись с тегами, которые мы использовали. Это поможет вам научиться создавать свои проекты, без чьей либо помощи.
Mammothbooth
The team behind MammothReach created this cool photobooth MammothBooth
The Detroit based artists of wanted to create the raddest photobooth the world has seen and with that, the website was born.
«We desired a site that was fluid, instant, and fun,» remembers designer/developer Nick Keebaugh, «and that’s exactly how our booth is. All in all, we wanted a completely custom feel throughout the site that mirrored who we are as a company and what our product does at its core. The website is the online extension of the MammothBooth through and through.»
MammothReach utilised the rotate transform property with a large spiralling burst image that’s in constant rotation. Fun content slides in as you visit the different sections of the site with animated style properties. The playful Arvil Sans font is a great fit for the aesthetic and is available as a ‘name your price’ font from the .
Теги – основа языка HTML
Пользуясь простыми примерами кода
HTML, мы словно
конструктор, собрали свой site, однако можем ли мы сделать это самостоятельно?
Чтобы написать веб-страницу с нуля, нужно знать всё о тегах и принципах их
использования. Разберёмся, как создаются
сайты html, опираясь на азы, знакомые каждому профессиональному
веб-программисту. Тегов очень много,
поэтому мы выделим основные:
- <html></html> – используются для
открытия и закрытия веб-страницы, давая браузеру понять, что он имеет дело с
веб-документом; - <head></head> – содержит ключевые
данные, касающиеся веб-страницы; - <title></title> – содержит основной
заголовок – описание содержания страницы; - <body></body> – тело страницы, в
котором помещаются все объекты, которые нужно видеть пользователям Интернета,
это могут быть картинки, заголовки, текстовый контент.
Внимание! Надо уже на
этапе создания сайта подумать о его продвижении, так как теги Title и H1 будут
влиять на ранжирование страниц в результатах поисковой выдачи. Чтобы информация на страничках отображалась по центру, а ни как придётся, надо пользоваться тегами
Наверное, вы обратили внимание, что все теги парные, то есть один открывающий, а второй закрывающий. Однако существуют и единичные теги и самый распространённый из них это . Именно его использование помогает перепрыгивать с одной строчки на другую, делая отступ. Таких пробелов в статьях будет ровно столько, сколько веб-мастер поставит соответствующих тегов HTML
Чтобы информация на страничках отображалась по центру, а ни как придётся, надо пользоваться тегами
Именно его использование помогает перепрыгивать с одной строчки на другую, делая отступ. Таких пробелов в статьях будет ровно столько, сколько веб-мастер поставит соответствующих тегов HTML.
Пример блочной вёрстки
Но, сколько не теоретизируй, а понимать всё проще на примере.
Итак, у нас есть макет (рисунок ниже). Условный, конечно — просто разметка, ведь цель примера — как можно наглядней объяснить принцип создания блочной вёрстки. Зная базу, навести красоту и усложнить макет вы сможете и сами, а я лучше не буду перегружать пример.
Согласно макету, страница сайта будет содержать пять блоков: «шапку», навигационное меню, боковую панель, основной блок с контентом и «ноги».
Сначала создадим HTML-страницу: обозначим структуру, разметим её. HTML-код будет таким:
<!DOCTYPE html>
<html>
<head>
    <title>Блочная вёрстка</title>
<link rel="stylesheet" type="text/css" href="style.css">
</head>
<body>
<div id="container">
	<div id="header">
	<h2>header (шапка сайта)</h2>
	</div>

	<div id="navigation">
	<h2>Блок навигации</h2>
	</div>

	<div id="sidebar">
	<h2>Левая панель</h2>
	</div>

	<div id="content">
	<h2>Основной контент страницы</h2>
	</div>

	<div id="clear">

	</div>

	<div id="footer">
	<h2>footer (низ сайта)</h2>
	</div>
</div>
</body>
</html>
Разберём некоторые моменты.
<div id=»container»> — это блок-родитель, внутри которого расположились все остальные блоки. Как ячейки таблицы внутри <table>. Назначение дочерних контейнеров должно быть понятно, за исключением разве что блока <div id=»clear»>. Это вспомогательный слой, его смысл будет понятен, когда вы увидите код CSS.
Если открыть HTML-файл в браузере, не подключая таблицу стилей, страница будет выглядеть так.
Теперь добавим файл CSS, код которого приведён ниже.
body {
     background: #FFF;
     color: #000;
     font-family: Arial, sans-serif;
     font-size: 14px;
}

#header {
     background: #F5DEB3;
     width: 100%;
     height: 55px;
}

#container {
     background: #FFD700;
     margin: auto auto;
     text-align: center;
     width: 80%;
     height: 400px;
}

#navigation {
     background: #FE9798;
     width: 100%;
     height: 25px;
}

#sidebar {
     background: #40E0D0;
     float: left;
     width: 20%;
     height: 280px;
}

#content {
     background: #DCDCDC;
     float: right;
     width: 80%;
     height: 280px;
}

#clear {
     clear: both;
}

#footer {
    background: #00BFFF;
	width: 100%;
	height: 40px;
}
С помощью стилей мы последовательно оформляем содержимое тега <body> и всех находящихся внутри контейнеров с помощью ранее изученных правил.
#clear { clear:both; } запрещает обтекание элемента слева и справа. Если убрать это правило, вёрстка «поедет» и низ сайта перестанет корректно отображаться.
CSS творит чудеса, и с ним наша HTML-страница примет уже совсем другой вид.
Вот и весь смысл блочной структуры. Дальше можно только наполнять сайт содержимым и усложнять оформление, но делаться это будет всё равно по изложенному выше принципу. Также посмотрите статью про вёрстку сайта из PSD макета, там эти принципы показаны более наглядно.


Дата размещения/обновления информации: 29.04.2021 г.
Сообщить об ошибке
Working with Selectors
Selectors, as previously mentioned, indicate which HTML elements are being styled. It is important to fully understand how to use selectors and how they can be leveraged. The first step is to become familiar with the different types of selectors. We’ll start with the most common selectors: type, class, and ID selectors.
Type Selectors
Type selectors target elements by their element type. For example, should we wish to target all division elements, , we would use a type selector of . The following code shows a type selector for division elements as well as the corresponding HTML it selects.
CSS
HTML
Class Selectors
Class selectors allow us to select an element based on the element’s attribute value. Class selectors are a little more specific than type selectors, as they select a particular group of elements rather than all elements of one type.
Class selectors allow us to apply the same styles to different elements at once by using the same attribute value across multiple elements.
Within CSS, classes are denoted by a leading period, , followed by the attribute value. Here the class selector will select any element containing the attribute value of , including both division and paragraph elements.
CSS
HTML
ID Selectors
ID selectors are even more precise than class selectors, as they target only one unique element at a time. Just as class selectors use an element’s attribute value as the selector, ID selectors use an element’s attribute value as a selector.
Regardless of which type of element they appear on, attribute values can only be used once per page. If used they should be reserved for significant elements.
Within CSS, ID selectors are denoted by a leading hash sign, , followed by the attribute value. Here the ID selector will only select the element containing the attribute value of .
CSS
HTML
Additional Selectors
Selectors are extremely powerful, and the selectors outlined here are the most common selectors we’ll come across. These selectors are also only the beginning. Many more advanced selectors exist and are readily available. When you feel comfortable with these selectors, don’t be afraid to look into some of the more advanced selectors.
All right, everything is starting to come together. We add elements to a page inside our HTML, and we can then select those elements and apply styles to them using CSS. Now let’s connect the dots between our HTML and CSS, and get these two languages working together.
Free Blogging HTML Templates
These simple HTML templates for bloggers offer a professional and user-friendly platform for your content. They will help you attract more readers and provide a modern and clean home for your written content.
Spurgeon Clean & Minimal HTML Blog Template (Free)
Spurgeon is a minimal, sleek design for your blog. You can use it to introduce yourself and categorize posts and other content efficiently.

Emily Personal Blog HTML Template (on Envato Elements)
Here is another free template for your personal blog. The homepage is structured as an “About Me” section, while other categories exist for written and visual content that you share each day.

Editorial & Blogging HTML5 Web Template (Free)
If you share many types of content, this template is for you. It has a full set of menu sidebars, and a helpful search function to help audiences find what they’re looking for with no issues.

Genial Minimal Blog HTML Template (on Envato Elements)
Genial is a template for your blog or online portfolio. Drop in your content and place it across over 15 page designs and layouts.

Brook Minimal HTML Template for Blogs (Free)
Brook puts content front and center without compromising stylish looks. It’s an excellent choice for bloggers who like to illustrate and put their words first.

Future Imperfect HTML5 Blog Template (Free)
Future Imperfect presents content in clearly defined sections, making it easy to navigate. You can control text previews, image thumbnails, and more, helping drive engagement on key topics.

Dropcast HTML Website Template (Free)
Dropcast is built for podcasters and multimedia content creators. Consider this one if you need to elevate your outreach to your listening audience.

Massively Blogging HTML5 Web Template (Free)
A lookbook design combines portfolios and blogs to share visual content in new and creative ways. It helps you capture (and keep) the attention of future readers, clients, and customers.

BucketListly
Bucketlistly enables travellers and adventurers share their stories and encourage others to have their own adventures
BucketListly is a community that sets out to help users unlock achievements in real life while inspiring others to do the same. Built using Ruby on Rails with HTML5, SCSS, CoffeeScript and jQuery, the platform has the ability to let travellers and adventurers share their stories with their friends on the site as well as their connected social networks.
When a user shares a story on BucketListly, the platform automatically tracks what, when and where they’ve completed that life goal, letting them earn special badges and displaying all that data in a beautiful timeline and map.
96 Elephants
96 Elephants is named after the number of elephants killed every day in Africa
US-based Viget Labs has created an awareness-focused web experience to enlist support for the Wildlife Conservation Society’s mission to protect African elephants. Its most recent campaign is 96 Elephants, so-called because that’s how many elephants are killed every day in Africa.


The educational narrative is told through a series of single-page chapters, each detailing the very real complications at play in the ongoing effort to end the illegal act of killing elephants for their tusks. Despite the primary goal of driving sign-ups for a petition, the Viget team has done an artful job of balancing the immediacy that the omnipresent call-to-action presents against the more emotionally compelling, story-driven content.
Front and centre is the haunting art direction that compels you to stop and confront the emotional mission. The beautiful, edge-to-edge photography and magazine-like layout made the effort to build it responsively a challenge. Instead of starting with the desktop, the site was built mobile-first. That allowed the design decisions to be purposefully considered for small-screens instead of acting as a watered down proxy of the desktop experience.
Lab Partners
Lab Partners showcase their work with a colourful and decorative website
Art and design studio Lab Partners, run by husband and wife team Ryan Meis and Sarah Labieniec, has launched a colourful and decorative website which is one of the best examples of CSS around.
The attention to detail shines through for each page. The work section features a curated layout, which allows the portfolio to feel especially original. The project thumbnails have a large hover area that take advantage of the opacity property by clearly distinguishing the hover state. The Shop section is running on the Big Cartel shopping cart, but feels like an integrated part of the site with custom CSS applied to the elements.
«The web truly feels like one of the ultimate combinations of form and functionality,» observes Meis. He goes on to explain that it was both enjoyable and challenging to find a balance between the two. «In the end every problem turned out to be an opportunity to create a solution that I hadn’t originally thought of.»
Simple Portfolio Website Template in HTML & CSS
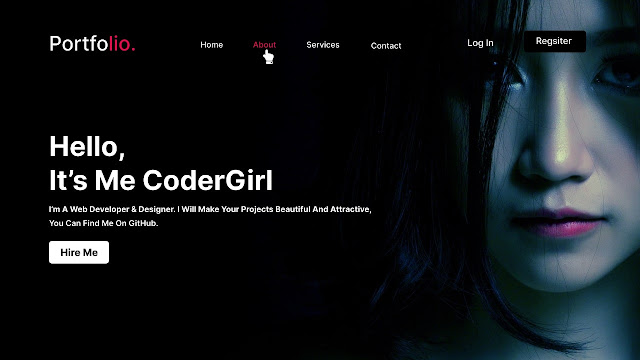
This is a Simple Portfolio website design created using HTML and CSS. The website includes a profile image, logo, navigation links, the person’s name, short details, and a button. This design is a great way to showcase a person’s skills and experience and can be easily customized using HTML and CSS.
If you are a beginner in HTML and CSS and want to create a simple Portfolio Website, this design is a good starting point. The provided links include a video tutorial and the source code files to help you get started. This is a great way to learn the basics of HTML and CSS and create a simple portfolio website template.
- Watch Video Tutorial
- Download Source Code
Envoy
CSS transitions are used to help aid in the Envoy demonstration
, a product that focuses on visitor registration at your office, offers an elegant iPad-based interface for collecting names, capturing signatures and printing visitor badges on the spot. For the website that promotes the app, the «primary goal was to allow our customers to visualise how their own visitors can experience Envoy at their offices,» explains co-founder and designer Vítor Lourenço. «We decided an interactive demo would be the most visually engaging way to demonstrate this.»
To achieve that, the site displays the app’s functionality and screen states atop an iPad mockup. As you scroll through the one-page site, the states update in the demo. CSS transitions are used to help aid in the demonstration, enhancing the experience without ever getting in the way of the content.
«We spent many hours working on tiny details,» co-founder and engineer Larry Gadea adds. «We love the way the visitor’s signature draws itself when you scroll past the NDA screen, or how the visitor badge gets printed at the end of the flow.»


